

Taxonomy Part 2
Learn about the taxonomy of the Sea Otter!

Yesterday, I explained what taxonomy was and gave a brief introduction to the 8 levels we use to describe and organize the organisms of the world. Check it out here: http://www.soundviewcamp.com/nature-blog/2020/5/14/taxonomy
Today, I am going to go through the basic 8 levels and what they mean for my favorite animal, the Sea Otter.
Sea Otter Taxonomy

Photo:https://www.expii.com/t/levels-of-organization-within-organisms-cells-10023
Domain: I I mentioned yesterday, there are 3 domains: Archaea, Bacteria, and Eukarya. The first 2 are single-celled organisms that do not keep their DNA enclosed in a nucleus. The domain Eukarya includes single-celled and multi-celled organisms that do enclose their DNA in a nucleus. This is the domain that Sea Otters are in.
Kingdom: Within the domain Eukarya, there are four kingdoms: Plantae, Fungi, Protista, and Animalia. Sea Otters belong in the kingdom Animalia, or animals, because their body is made up of multiple cells that do not have cell walls, they need to eat other organisms to gain nutrients (Heterotrophic) and they are capable of motion in some point in their life.
Phylum: In the kingdom Animalia, there are about 35 phyla. Nine phyla out of the 35 cover most of today’s living species. The phylum that Sea Otters belong to is called Chordata. This phylum consists of animals that at some point when they are growing have: a notochord, a dorsal hollow nerve cord, gill slits, and a tail that extends beyond the end of the digestive system. A notochord is a supportive rod made of cartilage, the same material in your ear lobe. For many members of phylum Chordata, the notochord is replaced by a backbone. We call these animals Vertebrates. Although Sea Otters do not have gills when they are born, they have them for a short time while they are developing as an embryo. This is the case for many animals in this phylum.
Class: Within the phylum Chordata, Sea Otters belong to the class Mammalia. Sea Otters are mammals because they produce their own body heat (endothermic), have fur, give live birth, have mammary glands that produce milk for mothers to feed their babies, and have a complex brain. This is the last level we, as humans, share with Sea Otters.

Sea Otter Skull- Note the teeth Photo: http://www.skullsite.co.uk/Sotter/sotter.htm
Order: The order Sea Otters belong to is Carnivora. Members of this order are typically meat-eaters, or carnivores. There are some exceptions to this as a few members are omnivores, meaning they eat both meat and plants. An example of this are bears and raccoons. The Panda belongs to this order as well even though it is herbivorous, only eating plants. Carnivora are typically noted by their pointed teeth that are used for tearing meat. They can also only move their jaw up and down. They cannot move it side to side like humans and other primates can. Sea otters crack open shells and chew their food more than most Carnivora members so their back teeth are flatter than dog or cat teeth are.
Family: Sea Otters are members of the Mustelidae family. This family group is known for typically having long bodies, short legs, rounded ears and a powerful bite. Most member also have scent glands that they use for mating, marking territory, or in the case of a skunk, for protection. Though river otters have sent glands, Sea Otters are an exception to the sent gland rule. They spend their whole lives in the water where sent glands are not useful. Other members of this family include weasels, badgers, skunks and wolverines.

Photo: https://medium.com/@exploreorg/explore-org-and-seaotters-com-aed4f4080ec8
Genus: Enhydra is the Sea Otter genus. Sea Otters are the only extant (existing) member of this genus for fully aquatic otters. Enhydra means “in water.” There is one extinct member of this species, an otter that lived in the Eastern Atlantic ocean around two million years ago. All otters belong to the Subfamily Lutrinae. There are many genera of otters. Today’s otter species are represented in eight different genera.
Species: The species of the Sea Otter is Lutris, which means “otter.” This makes the scientific name of the Sea Otter: Enhydra lutris. There are three subspecies of Enhydra lutris. They are seperated into subspecies because they live in different area’s of the Pacific Ocean: Southwestern coast of North America, Northwestern coast of North America, and Northeastern coast of Asia.
In learning about the taxonomy of an organism, you can learn a lot about the characteristics, ancestors, and relatives of the species. I encourage you to do this for a species you are interested in to see what you learn about them!

Taxonomy
How do we name and organize the creatures of the world?

Photo: Wikipedia
In many of my blog posts about animals and plants, I often mention at least the species’ “Latin name”. Occasionally, I also mention a Family or Order that that animal is in in order to share what other organisms are related to them. These ways of describing living things and organizing them into groups of similar living things is called Taxonomy. Taxonomy helps us understand how organisms are similar and/or different from each other. It also gives scientists all around the world a common language to use when talking about these organisms.
Humans have been classifying organisms for a very long time. The current way of categorizing and naming organisms was started by a scientist named Carl Linnaeus in the mid 1700’s. He came up with a system that had 7 levels. As the world discovered more and more organisms, we added another level as well as some sub-levels to properly organize Earth’s organisms. Each level groups organisms together based on similar traits. Linnaeus and scientists of his time had to use only traits that they could see. Today, we not only use visual traits, but also DNA to help us categorize. He also started the idea of what we now call the “scientific name.” This is also known as binomial nomenclature, or the “two name way of naming.”
Most organisms have multiple names they are called by. They common name is what the organism is commonly called by people of the area. An organism can have many common names because people of different areas call them different things. For example, the rolly-polly also known as the potato bug, pill bug, woodlouse, sowbug, doodle bug, etc. These names are also given to many species of similar looking bugs. The scientific, binomial name for one species of these animals is Armadillidium vulgare. That way if you are a scientist studying rolly-pollies, you and all other rolly-polly scientists know exactly which species is being discussed no matter the common name that they use.
So, how do we get the scientific, binomial name? It comes from the organism’s genus and species name. Before we get to these two ending levels, let us learn what all of the levels are:

I like to think of each level as a set of boxes. The domain boxes are the largest and currently there are three of them. All organisms on Earth are put into one of the three “domain boxes.” Also within that box are multiple Kingdom boxes that divide the organisms even more. Within one Kingdom box, there are many Phylum boxes, and so on until you get to species. A species is group of similar individual organisms that can successfully breed, or have babies. So the scientific, binomial name of an organism includes the last two levels (genus and species) because they are the most specific way to identify an organism.
These categories also help us learn about the common ancestors that organisms share. Organisms with similar traits and DNA have at one point all come from one common ancestor that no longer exists. Organisms that all belong to the same genus share a more recent common ancestor than all of the organisms in one domain.
So if we take any organism, we can learn more about it based on the taxonomic “boxes” they fit in. In an effort to keep things short today, this is what I will do in tomorrow’s blog post. You can suggest an organism in the quiz below.

10 Essentials for Outdoor Adventuring
What should you bring once you can resume adventuring outdoors?
Many are looking forward to the outdoor adventures they will get to have once they are able to again. Whether you are looking forward to camping, hiking, or backpacking, you can start preparing for your adventure now by making (or making a plan for) your 10 essential sets of items. The 10 essentials are items that are fantastic to have with you whenever you spend time outdoors. They help you stay prepared for emergencies, weather changes, staying out longer than you thought you were going to, and more. This is also an excellent way to follow the first Leave No Trace guideline: “Plan Ahead and Prepare.” Read more about Leave No Trace here: http://www.soundviewcamp.com/nature-blog/2020/4/3/leave-no-trace
The 10 essential sets of items include: navigation, source of light, sun protection, first aid kit, repair kit/tools, extra clothes, fire kit, shelter, extra food, and extra water. Though you may not need all of these thing on every hike, the one time you might, you will be glad you have them. You never know when that one time will be, so it is a great idea to have your 10 essentials for every adventure.

1. Navigation
Part of planning ahead is learning about the area you plan to explore. This involves getting a map of the area in which you are hiking or camping. While using your phone or a GPS can be fun and helpful, you do not want to rely on them in an emergency because the battery could run out or it could lose signal. Therefore, before you leave, familiarize yourself with the map and the path you plan to follow. Another great navigational tool is a compass. Make sure you learn how to use the compass before bringing it on your trip! Maps and compasses work best together.
2. Source of Light
A flashlight or a headlamp are great portable sources of light. Even if you are hiking during the middle of the day, it is a good idea to bring one of these sources of light so if you spend more time outside than you were planning, like if you get lost or someone gets hurt, you will be prepared to see in the dark. They can also be used to get someone’s attention in case of an emergency. Always be sure you have a working extra set of batteries for your light source. Headlamps give you the advantage of having your hands free when you are using it.
3. Sun Protection
Even on a cloudy day, you can get a sunburn. While sunshine offers many benefits, too much of it can be harmful to our bodies. Sun protection can take many forms: sunscreen, hat, sunglasses, and protective clothing. The best option is to use many of these things to protect your body from harmful effects of the sun. Remember to apply your sunscreen before heading out and to reapply every 2 hours.

A few of the things in my basic day hiking first aid kit
4. First Aid Kit
I have used my first aid kit many times on trail. Sometimes for myself, but more often to help fellow hikers on the trail. Depending on the length of your trip and the number of people coming with, you may need different things in your first aid kit. There are many pre-made kits you can get at the store. I always make sure to carry adhesive bandages of different sizes (band-aids), an elastic bandage (for wrapping hurt limbs), blister prevention supplies (mole skin, medical tape), tweezers (for splinters), and insect repellent (to prevent itchy bug bites). Make sure with your first aid kit, you bring a knowledge of how to use what is inside. It is a great idea to have someone trained in first aid with you when you hike!
5. Repair Kit/Tools
This will change based on what you are bringing with you. In general, it is a great idea to carry some duct tape and a multi-tool with scissors and a knife (with parent permission). I often will wrap a few layers of duct tape around a pencil or my water bottle so I don’t have to bring a full roll. You may also want a patch kit for your rain gear or tent if you are on an overnight trip. String is also a helpful repair item. If you bring the right string, it can help start a fire as well.

My headlamp and batteries for source of light. String, needle and thread, hair ties, and duct tape for my repair kit. Matches, water-proof container and a fire starter for my fire kit. An emergency blanket for my shelter.
6. Fire Kit
Just like your first aid kit and compass should also include knowledge of how to use it, you should be familiar with starting a safe, controlled fire before using a fire kit. Otherwise, you can make sure an adult coming with you has a fire kit with them. Check out our lesson on fire building here: http://www.soundviewcamp.com/nature-blog/2020/4/8/fire-building In you fire kit, you should have matches in a water-proof container, and some supplies to use as dry tinder. Fires provide light and warmth in case of emergencies. Make sure to follow the “Minimize Fire Impacts” Leave No Trace principle anytime you have a fire.
7. Extra Clothes
Weather can be unpredictable. Even with a low chance of rain for the day, you may find yourself out in the rain or in some more wind than you expected. For this reason, always bring some extra clothes to protect you from the elements. Hats, gloves, and an extra clothing layer are all great things to have with you. A waterproof layer can not only keep you dry but also protect you from the wind and keep you a little warmer.
8. Shelter
This one will look different based on the type of trip you are taking. If you are camping or backpacking your shelter will be the tent that you are taking with you. For a day hike, bringing a light weight emergency blanket or a bivy sack, maybe helpful in case you get lost or stuck longer than you were expecting.
9. Extra Food
When I go on a day hike, I enjoy eating lunch on the trail. My lunch however does not count as my extra food for my 10 essentials. On top of what I bring for lunch, I pack some extra nutrition just in case I am on trail longer than I expect. This food is generally something high in protein so it will stick with me a while. Energy bar, trail mix, and jerky are all good options because they are not too heavy and do not require refrigeration or cooking.

10. Extra Water
Staying hydrated effects your whole outdoor experience. Drinking enough water prevents headaches, cramps, grumpiness and more. Because you are being active, you may need more water than you typically drink in a day. How much water you need changes depending on the season. When it is hot out, your body loses water faster and you need to drink more to replace it. Make sure you always bring more water than you will need. For hikes more than 2 hrs, I usually carry 2 full 32oz water bottles but water requirements for everyone are a little different. If you are going on a long overnight or multi-night trip, you may need a water purifier to replenish your water supply.
The 10 essentials offer great guidelines for what to pack on your trip. If you have some of these things lying around the house, you can practice carrying them on neighborhood walks. You can also split many of these things up among your adventuring group, like the first aid kid, repair kit, fire kit, navigation, and shelter. Make sure you talk with your adventure group about these things while planning your trip! Learn more about the 10 essentials here: https://www.nps.gov/articles/10essentials.htm

A Most Successful Camping Trip
The tale of John Muir and Theodore Roosevelt.
On this Earth Day, I want to share the tale of two men - one, a conservationist and fierce advocate for the idea of national parks - and the other, a rugged outdoorsman who became President of the United States.
John
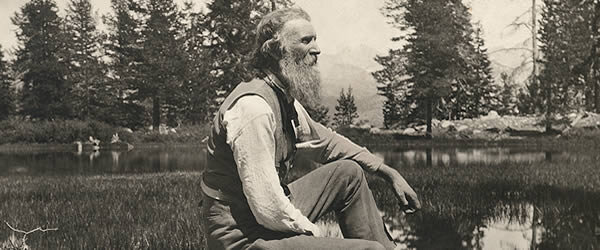
John Muir
John Muir (1838-1914) was the son of a Presbyterian minister. He was born in Scotland and came to the United States in 1849 where they settled in Wisconsin. This, of course, was a time of great upheaval in the country. A civil war was brewing and later fought, the industrial revolution was underway and would dominate American life to create land barons and tycoons, and the land was viewed as something to “tame” - and not to preserve.
John could have easily jumped into the manufacturing careers of the time as he was talented and smart. But, he felt the calling to wander - to explore - to sketch what he observed - and to write about it. His writings were noticed by the magazines of the time and published. John considered his transformation as an advocate for preserving the environment as an “unconditional surrender to nature”.
You can read more about John Muir HERE.
Teddy

Teddy Roosevelt
Theodore (Teddy) Roosevelt (1858-1919) was born to a wealthy, connected family in New York. He suffered from various childhood ailments that kept him home, inside for much of the time. He, however, was very interested in nature so, even as a kid, he studied taxidermy so he could preserve and study animal specimens. He would donate his work to museums so others could learn also.

Teddy and John at Yosemite (Glacier Point)
Teddy overcame his childhood sicknesses by being an advocate of what he called “the strenuous life”. He got outside. He learned to hunt, to ride horses, to herd cattle, to fish, and later, even though he was comfortably set as a public official, he led a cavalry regiment - the Rough Riders - into battle during the Spanish-American War. Teddy became Vice President and then President (the youngest ever) when Pres. William McKinley died. He became a wild, popular, different kind of a president - one who was interested in respecting the beauty and diversity of nature.
You can read more about Teddy Roosevelt HERE.
The Camping Trip
In 1903, President Roosevelt took a three-day camping trip with John Muir to the unspoiled Yosemite Valley. John wanted to persuade Teddy to return this area of the nation to federal protection. He did. Not only did President Roosevelt resolve to protect Yosemite—he would go on to sign into existence 5 more national parks, 18 national monuments, 55 national bird sanctuaries, wildlife refuges, and 150 national forests.

“Roosevelt did more for the national park idea than any other president in history. During a cross-country trip in 1903, he spent three nights camping alone in Yosemite with the other great champion of the parks, mountain prophet John Muir, who enlisted Roosevelt into making Yosemite Valley part of a larger national park. Snow fell on them the night they camped here, near Glacier Point. It was, the outdoorsman president recalled, “the grandest day of my life.””
Why Knot? - #3 - Synthetic Rope
Learn about the advantages (and concerns) of synthetic (people-made) rope.

Climbing Rope
Most of the rope you will buy in the store now is synthetic. The invention of plastic and other polymers truly changed the world in may ways but, however, with a cost. Synthetic materials do not break down over time. For this reason, we should always be committed to recycling and re-purposing and working to keep synthetic products from ending up in the oceans. As rope is heavily used in the maritime industry, this is doubly important.
Synthetic rope is more durable than natural rope. It can be manufactured in many ways to alter what it is used for. It can have a lot of stretch or just a little stretch. It can float or sink. It can be produced in any color. It can be any size from thin fishing line all the way up to the monstrous mooring lines (hawsers) found on ships.

Spool of Nylon Rope
NYLON
Nylon rope is known for its elasticity and ability to absorb tremendous shock loads. this rope will not rot and is resistant to oil, gasoline, and most chemicals. Along with having good abrasion resistance, nylon rope also has good resistance to UV rays. Nylon rope is used for all sorts of things and you will find it on boats and ships of all sizes. Nylon rope sinks.
The ropes on the Sound View challenge course are made of nylon. There is a woven sheath as well as a tightly woven core which gives it strength. Some of the ropes stretch very little while others, such as on the Big Jum, stretch a lot to absorb the energy of a falling (or leaping) participant.
Fishing line is usually made of a single strand of nylon.

Spool of Polypropylene Rope
POLYPROPYLENE
Polypropylene is a lightweight rope that does not absorb water. It is resistant to oils, mold, mildew, and most chemicals. As such, polypropylene is an ideal rope for certain marine applications. For example, because this rope floats in water, it is often used to create swimming lanes. and ski rope. A lot of general-purpose rope is also partly made of polypropylene.

The At Home Naturalist: Nature Journaling
Start a nature journal!
Last post I talked about how you can get involved in nature and even help with scientific research through the use of technology. I know that using technology is not for everyone especially when it comes to enjoying time in nature. Taking a walk or spending time in your backyard is also a great time to “unplug” and enjoy your surroundings. Through this post I will share some tips to get you started with another great way to be a naturalist at home: nature journaling.

Audubon picture of a Barred Owl Photo: www.audubon.org
The great thing about nature journaling is it can look however you want it to. You can fill it with sketches, painting, poetry, stories, etc. You also can be more scientific, documenting your observations on appearance and behavior, as well as taking measurements. Fill your journal with some combination writings, drawings, photography (this one does require a little technology though). If you don’t mind the use of a little technology, you could also make a video journal. You can also push yourself to work on a new skill or improve an old one.
Nature journaling in some form is at the heart of what it means to be a naturalist. A naturalist is a person who studies and shares about the natural world around us. Some famous naturalists include: John James Audubon who documented many species of birds including discovering new ones through his paintings, Charles Darwin whose observations and journaling led to ideas on natural selection, Rachel Carson who wrote articles and books to teach people about natural history and warned of the effect pesticides have the environment, and David Attenborough who writes and narrates documentaries that helps bring nature around the world to our televisions. All naturalists have a way of documenting and sharing their knowledge and observations with others.
Starting your Nature Journal

Like I have been saying, there are numerous ways to make a nature journal but a great way to start is to start practicing your observation skills. To start practicing this, what you will need is some paper, a writing utensil and a simple nature object like a rock, stick, leaf, or flower. Remember not to pick anything off of living plants. Sit somewhere comfortable where you can look at this object for a while. Start using your senses to make observations about your object. Write these down. You can also draw your object and label the observations you are making. What is the shape? Colors? Textures? What does it smell like? What sound does it make? Even if it feels like a silly observation, write it down. Once you have observed all that you can, look for more maybe from a different angle. Then spend some time writing down questions you have about it, even if they are silly. You can also write things that the object reminds you of.
The next time you journal, try a new object or maybe do this for a bird in your yard or an invertebrate you find under a log. It is important to keep going even if you feel silly because the more you practice, you will become more observant. Through this, you can learn a lot about the natural world around you. You also do not need to know the names of things or what even they are, just focus on using your senses. You can share your findings with your friends and family or keep them to yourself.
Other important things you can include in each journal entry include: the date, time, exact location, and weather.
You can also add some nature related poetry, art, leaf rubbings, printed photos. Don’t worry about any of your work being “good.” What really matters is that your journal connects you with nature and you gain some new observations or knowledge from doing so. Just remember to leave no trace and leave nature as you found it!
John Muir Laws, a fantastic naturalist and nature journaling expert, has some great resources, tips and drawing lessons on his website: https://johnmuirlaws.com/
Why Knot? - #2 - Natural Rope
The next in our knot series
Natural rope has been made from all sorts of plant byproducts. Anything that produces fibers van be twisted into yarn and then twisted again into rope. Here are some examples:
Cotton Rope is a lightweight soft 3-strand rope that is often used for decorative purposes. Cotton rope is very stretchy and is extremely comfortable to handle. It can also be easily dyed. Cotton ropes are used for sash cord, clothesline, and Venetian blind cords
Manila rope is a type of rope made from manila hemp. Manila hemp is a type of fiber obtained from the leaves of the abacá. The name refers to the capital of the Philippines, one of the main producers of abacá. Applications and properties Manila rope is very durable, flexible, and resistant to salt water damage, allowing its use in rope, hawsers, ships' lines, and fishing nets. It can be used to make handcrafts like bags, carpets, clothing, furniture, and hangings.
Sisal is a species of Agave native to southern Mexico but widely cultivated and naturalized in many other countries. It yields a stiff fiber used in making various products. Sisal rope is a hard natural fiber with many characteristics of manila rope but offers 80% of its strength. Sisal is more economical than manila. It has a good knot-holding ability. It provides great knot holding ability and is sunlight resistant.
White coir, harvested from unripe coconuts, is used for making finer brushes, string, rope and fishing nets.[2] Coir rope has the advantage of not sinking, so it can be used in long lengths on deep water without the added weight dragging down boats and buoys.


All these natural ropes will deteriorate over time. This may seem unfair and expensive for the human that owns the rope or fishing net, but if a fishing net is lost, it will entangle sea life for years - but even longer if it never rotted naturally or could be consumed by other sea life.
Why Knot? - #1 - Rope? or Line?
A rope is named for its purpose.
Rope making surely changed the world. The ability to pull (instead of push), to secure, to weave, to stitch and to harness animals depended on rope of carious sizes and make. Historians have no idea when people started twisting fiber into yarn and then yarn into rope. Because rope was made with natural fiber, remnants would rot away and disappear long before archaeologists could discover them.

A spool of rope.
Sailors like to put names to things. Imagine being on a sailing ship long ago and someone yells, “Pull in the the rope ! “ What rope? There is rope everywhere tied to everything imaginable!
Rope, on a ship especially, is given a name to designate its purpose. At Sound View, you will find useful rope at the waterfront, on the flagpole, and also at the rope course. Each piece has been cut for a specific purpose.
ROPE - what you buy at a store, or what is in storage on a spool. Rope has not been cut for a purpose yet.
LINE - a length of rope that has been cut for a purpose.
HALYARD - a line that pulls up something - like a sail - or a flag.
SHEET - a line that pulls in a sail.
PAINTER - a line that is attached to the bow or stern (front/back) of a small boat to tie it up.
STAY - a line that holds up a mast . One end is attached to the top of the mast and the other end is attached to the bow or stern.

Dinghies tied up with their painters
STAY - another line that holds up a mast . One end is attached to the top of the mast and the other end is attached to the side of the boat.
HEAVING LINE - a small line to throw to another boat, or onto a pier, or to a person in the water.
MOORING LINE - used on larger boats to tie up.
RODE - line and/or chain that attaches the anchor to the boat.
BELAY LINE - the line used on the ropes course to secure the climber to a safety system on the ground.
LOBSTER CLAWS - a short line rigged with various knots and carabiners to create a personal safety system for climbing.